How to Decorate Horse Cupcakes
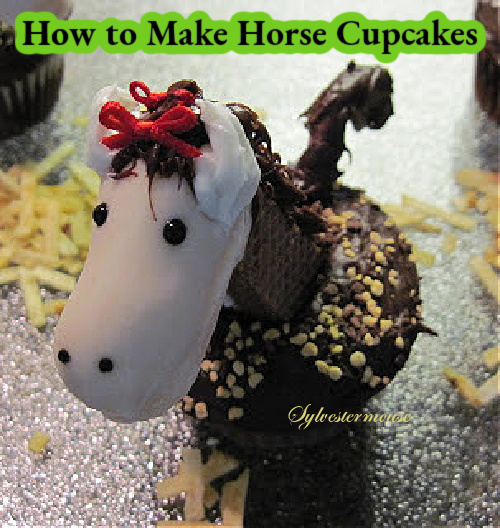
Horse Cupcakes are Lots of Fun!
These Horse cupcakes would be a delightful treat for birthday parties or just about any special occasion for the horse and pony enthusiasts. Below I have shared step by step instructions including photos to make your Horse Cupcake decorating experience a pleasant adventure.
I even share a few “what not to do” tips that we discovered while making our horse cupcakes, after all, we really just want to have a little fun and maybe a few laughs.
These horse cupcakes are sure to draw rave reviews at any party. They will certainly be no “neigh” sayers!
(yes, I know it is spelled naysayers. Just having a little fun with words too!)
How To Begin Your Horse Cupcakes
This article is about decorating the cupcakes, therefore, we are going to start with the cupcakes already baked, cooled and ready for decorating.
 I started this project alone, but I became so frustrated that I needed a bit of support. As always, my husband ran to my rescue. Between the two of us, we tried several different methods of attaching the head, inserting the neck to the body and when to add the decoration. We have now refined the art of decorating horse cupcakes. The following instructions are given step by step with photos and will save you a world of time and frustration if you follow our methods. The reasons behind some of our directions may not make sense as you proceed, but we devised these instructions through trial and error. Trust me, this is one cupcake you don’t want to completely assemble and then try to decorate!
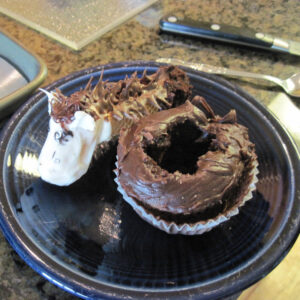
Just so you get the picture, I have included a photo of my first attempt on the right. Poor thing! He tried so hard to work for me. Believe me, I was just as faithful to him. I gave him a new body and my husband gave him a new face.
Now, he is happily a part of our pony parade.
IMPORTANT NOTICE:
This Article is Vegetarian Friendly!
No Horses were Harmed in the Making of these Cupcakes!
Ingredients Needed to Make Horse Cupc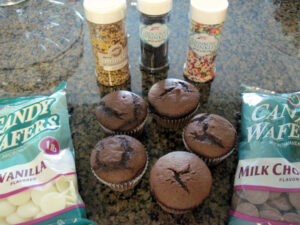 akes
akes
- Wax Paper Large Cupcakes (White or Chocolate ~ We used chocolate)
- Chocolate Frosting Black Frosting/Decorating Gel for the Eyes & Nose (We used a small tube of Black Gel)
- Candy Circus Peanuts (White if you can find them. Orange is the most common)
- White Chocolate Pieces/Melts
- Sugar Wafer Cookies
- Sprinkles or desired decoration
- Pretzels Potato Sticks for Hay ~ optional
Sprinkles to Decorate Horse Cupcakes
Sweets Indeed Dye-Free Chocolate SprinklesCheck PriceSet of 2 Pack Circus Peanuts Marshmallow CandyCheck PriceWilton White Candy MeltsCheck Price
Step by Step Instructions
Preparing the Head and Body of a Horse Cupcake
If you can find white Circus Peanuts, Skip Steps 1 – 3
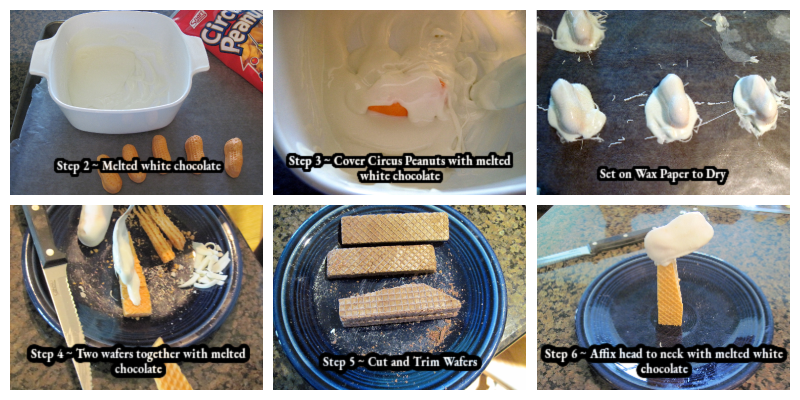
Step 1: Cover a tray with wax paper.
Step 2: Melt White Chocolate pieces. I melted mine in the microwave.
Step 3: Dip each Circus Peanut in the melted white chocolate and set on wax paper to dry. You can place the entire tray of coated peanuts in the refrigerator to harden quicker. Trim away excess white chocolate after they are dry. This will be the head of horse.
Step 4: “Glue” 2 Sugar Wafer Cookies together with melted candy and let them dry.
Step 5: With a serrated knife, gently saw the bottom of the sugar wafers (neck) at an angle. This will allow the neck to slip into the cupcake (body) easier later.
*We also tapered one long side of the sugar wafers for a shapely neck.
Step 6: Affix the candy coated circus peanut (the head) to the top of the sugar wafer cookies (the body) with melted chocolate.
*Icing/frosting will not hold the head on. The Circus Peanut is too heavy. You will have to hold the head & neck together until they dry together. (about 60-75 seconds)
Step by Step Photos of Making the Horse Cupcake Head & Neck
Decorating the Neck & Head of the Horse Cupcakes
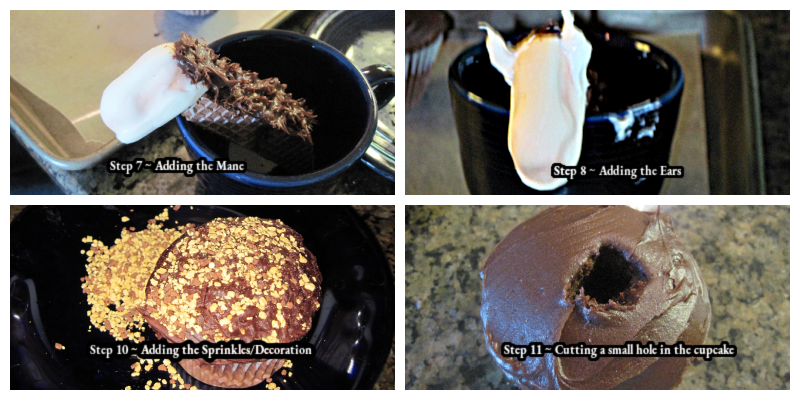
I placed the head/neck in a coffee cup to add mane.
Step 7: Frost the back of the neck and head for the mane. I used a fork to make a hair effect.
Step 8: Form ears with frosting.
Step 9: If you haven’t already done so, frost the cupcakes.
Step 10: Decorate the cupcakes (body) with sprinkles.
Step 11: Cut a small square out of the cupcake. (See photo)
*After the first horse assembly, we started cutting the small square in the cupcake to keep the cupcake from splitting and breaking when you insert the neck and head.
Step by Step Photos of Decorating Neck & Head of the Horse Cupcakes
Assemble the Horse Cupcakes
After trying this phase many different ways, we found this to be the best order of steps.
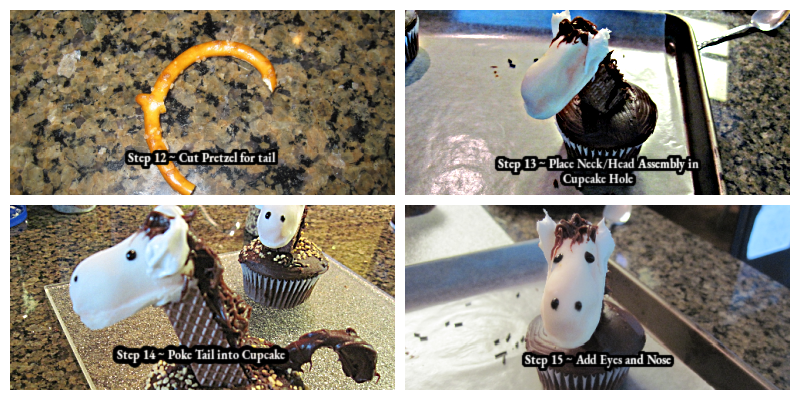
Step 12: Cut a pretzel for the tail.
Step 13: Place the neck/head in the hole in the cupcake.
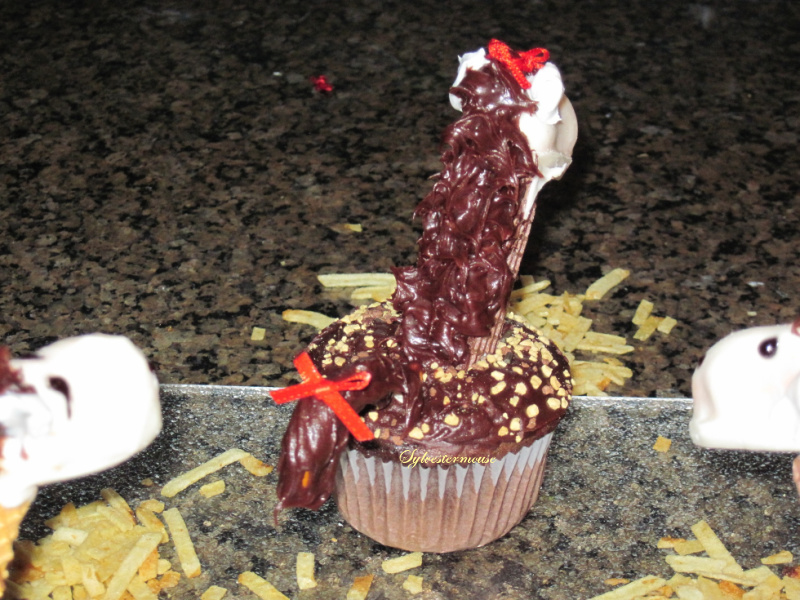
Step 14: Frost the pretzel (tail) and poke it in behind the neck. The tail will help balance the head.
Step 15: “Paint” on eyes and nose with black decorating gel.
*We found that adding the eyes and nose last was best. It was hard to keep from smearing them while working on final assembly of horse cupcake if they were already applied.
Step by Step Photos of Horse Cupcake Assembly
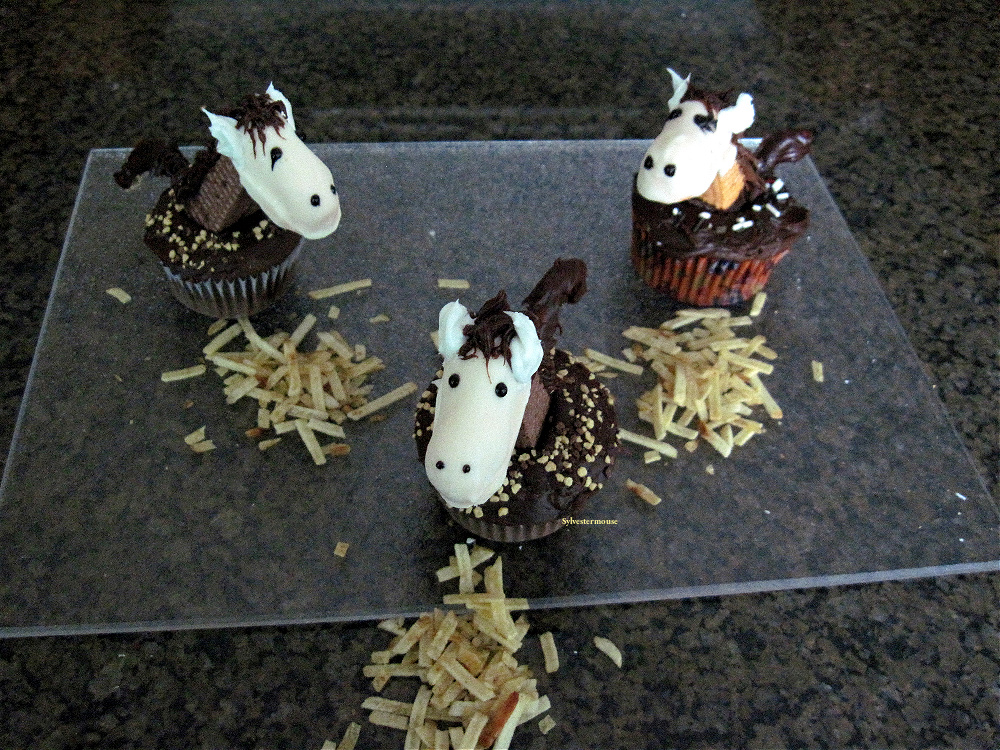
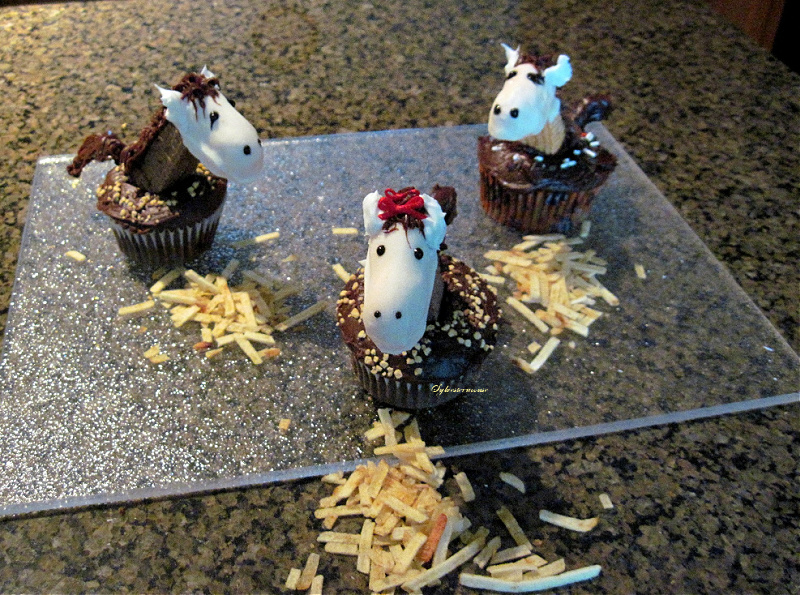
We added Red Bows

Now They All Want A Red Bow!
My Original Inspiration for My Horse Cupcakes
Hello, Cupcake!: Irresistibly Playful Creations Anyone Can MakeCheck Price
We Are Superstars!
Credits for this Article
ALL PHOTOS ON “HOW TO DECORATE HORSE CUPCAKES” ARE THE EXCLUSIVE PROPERTY OF SYLVESTERMOUSE
I have created some Zazzle products using the Horse Cupcake photos on Zazzle which are available for purchase by simply clicking this link for the Binder or this link for the magnet.
Thank you for stopping by!
Do Come Back and See Me Again!
~ Sylvestermouse ~
This article was originally published in 2010 on a website that no longer exists.
© 2010 Cynthia Sylvestermouse
You May Also Like

Chicken & Dressing Casserole Recipe
Chocolate Covered Bananas Recipe